This page should give you a general idea of how to use the ShadeTree
interface.
To see a shader in action, load one of our examples, and render them.
We have quite a few shader layouts to get you started. To load an example,
for instance, our fire shader:
- Enter the File menu, and click Open. In the file browser,
you should see a list of files. Scroll down to 'fire.str' and double click
on the filename.

- The box layout for our fire shader will appear on the desk. To
render an image, you can either..
|
..use the Render menu's F1 hot key:
|
..or hit the RENDER button:
|

|

|
- An image window should pop up, showing the rendering 'fire' image:

- To look at the shader source code, enter the Render menu,
and select View Shader Source, or hit the F9 hot key.
- A text window should appear, with the source code in your text
editor. (notepad.exe is the default text editor, unless you have your
EDITOR or STREE_EDITORCMD environment variables set to something else)
Back to top
There are at least three ways to drop new boxes onto the screen:

The most common way is to use the Main Menu, selecting the
boxes you want by walking the menus in sections.
Another way is to use the Operation Tool Bar.. you can pre-program
the toolbar buttons to keep your favorite boxes within easy access. These
settings get saved as part of your stree files, so when you load the
file, the toolbar remembers your settings.
The third way is the Menu Finder, which brings up an alphabetical
listing of all the boxes, that lets you pick boxes alphabetically by name.
Back to top
Once you have a couple of boxes on the desk, there are several ways to
interconnect them. One way is to click on a button and drag a connection
line:

Another way is to simply click/release on each button you want to connect:

Some boxes support multiple inputs, such as Mutliply, Add, and
Spline. Such boxes normally have input buttons that have numeric
postfixes, ie. B1, B2.
You can create new buttons by doing a click-and-drag on one of these buttons
to see an up/down arrow, which lets you create a new button
above or below the one you clicked on. These operations are
also available from the popup menu for the button;
Copy Above/Copy Below.
You can interactively create a new button while making the connection:


Notice that a new 'B2' button is created, and your new connection is
hooked up to it. In this case, S, T, and the output of
UserDefined are all multiplied together. Since multiplication is
communitive, the order of connections makes no difference.
Back to top
If you are making new connections over old ones, the old connections will
automatically drop out. However, if you want to selectively delete
connections, you can do so by clicking on the lines and hitting
Delete:

You can also hold down the SHIFT key to select several lines all
at once, and then hit Delete to delete all of them.
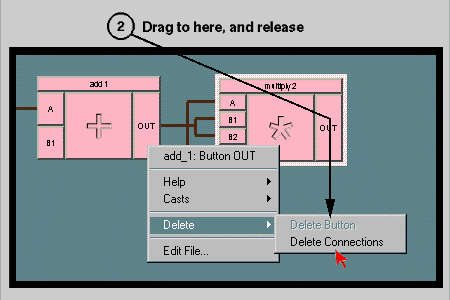
If you want to delete all connections to a particular button, you can invoke
the popup menu for the button by Right Clicking on the button in
question, and choose Delete-> Button Connections:


Back to top

Please report any problems with this document to
[email protected]
Copyright (c) 1996-1998 Cinema Graphics Inc. All Rights reserved.