This is how the program looks when you start up with a preloaded shader. The 'shader' is the collection of boxes all interconnected to form a visual program that defines the shader.
The Desk is where you connect operation boxes together to form your shader. Many examples are available to give you a starting point. You interconnect boxes by dragging connecting lines between the input and output buttons of the boxes. You can pan and zoom the desk around to view large layouts.
The Status Bar gives you general context-sensitive help, so that when you glide the mouse over boxes, you get help messages relevant for each box.
You bring down new boxes into the desk from the Menu. For example, 'Math' contains only math-related operations. 'Patterns' contains prewritten fractal and noise patterns.
The Menu Tool Bar gives you shortcuts to commonly used menu commands.
An Opereration Tool Bar lets you easily access operation boxes that you use frequently. You can re-program the Tool Bar to access your favorite operations.
The Slider Region contains 'sliders' that let you change the default values that are in the shader. When you select on a box, all of the inputs that are not connected come up as sliders. Sliders can be 'pinned' to make them remain up at all times, or 'stowed' to collapse them down.
The Slider Freeze button lets you prevent sliders from appearing and disappearing as you select different boxes. This allows you to 'lasso' several boxes, without having sliders created for them.
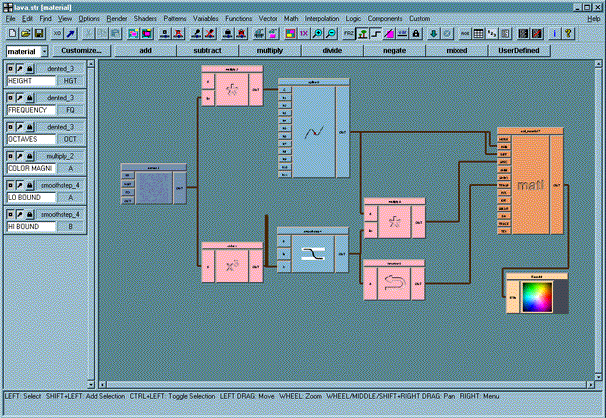
This example shows a lava shader. Many example layouts, both simple and
complex, are available to give shader authors a good starting point.
The author creates shaders by starting with an example shader layout,
or by just jumping in with an empty desk. Basically, the steps are:
By the way, this is what the above shader looks like when you hit 'render'.

An Operation Box

Here is a close up of 'plastic', on the desk at the center right. Values flow through the box from left to right...
Desk Sliders

|

|
These are the Desk Sliders for each of the unconnected
input buttons on the desk. In this case, we're looking at
the color sliders for the unconnected knot buttons (K1/K2/K3) on
the 'spline' box, shown hilighted above. In this case, the
sliders are set to pre-selected colors for the lava. You can
scroll down to see the other buttons.

This is the Render Options Editor (ROE) for the lava shader.
The editor is available from the main menu as Render->RenderOptions,
and allows you to control various rendering options such as resolution,
shading rate, object orientation, light positions, zoom, frame ranges
and buttons to invoke default or custom renders. (Custom render scripts
let you invoke your own scenes to render)
Note that the ROE's window can also be resized, so you can make the
window small, so you can just access the buttons you're interested in
while taking up a minimum of screen space.